Tuesday, November 04, 2008
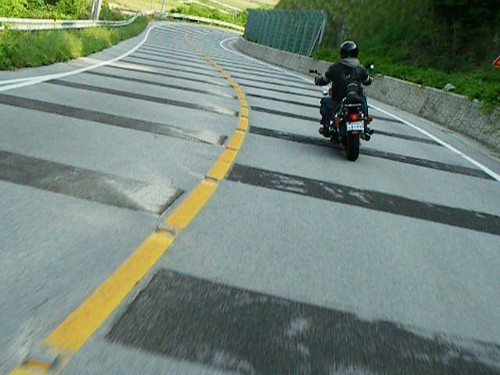
Curvy Galore - Iksan to Uljin Bike Tour
View Larger Map <-- You can download the Google Earth file here too.
Iksan to Uljin - Curvy Galore
Check out the photos here.
All the gps data here
Date: 081003-Friday
Starting Point: Iksan, South Korea
End Point: Uljin, South Korea
Riders: Greg - Hyosung 650 GTR, Older Greg - Honda 750 Magna, Damian Honda FireBlade CBR 1000, Jerry Honda FireBlade CBR 1000. Patrick BMW 650
Terrain: Highway, secondary
Curves: Good once in the mountains
Difficulty: 6/10
GPS Trip Data:
Total Time (h:m:s)
4:48:23
Moving Time (h:m:s)
2:48:23 (-48 minutes for navigation errors and such)
Distance (km)
180
Moving Speed (kph)
67.4 avg.
151 max.
Description:
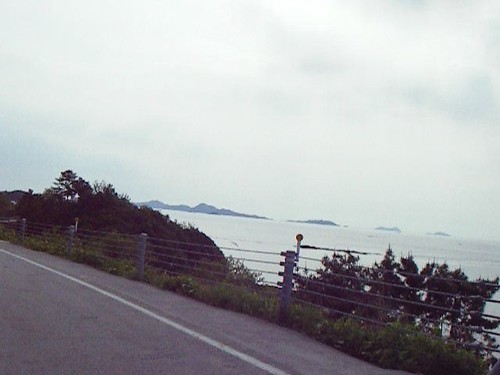
Greg and I Took the route Clair and I originally planned to ride to the Boryang Mud Festival. The first stretch is all highway, good to open the bike up on but otherwise not too exciting. Once in the mountains the highway gets more interesting, the curves are generally wide and soft with many straightaways. Things change dramatically on the West side of the lake, the road is extremely narrow and there are hairpin turns the entire way. The convex mirrors set up on some of the tight turns help a little but Greg and I still had moments of surprise, meeting up with oncoming Sunday drivers smack in the middle of the road. South of the shore the road opens up again and it's a fun and fast ride through the traffic back to Iksan. You could easily do this ride in two hours if you omitted all the stops along the way, perfect for a week day.
Monday, August 18, 2008
Roughing it in Manilla
Roughing it in Manilla
View Larger Map
This map is INTERACTIVE!
Click on flags for a description
Double click to zoom
Click and drag to move map
My lights wont turn on, at least not the ones wired into the wall and ceiling. I can't explain why my keycard isn't activating the main breaker. I'm too scared to call the front desk and request that someone to come up to the eighth floor and fix it for I might have to tip them.
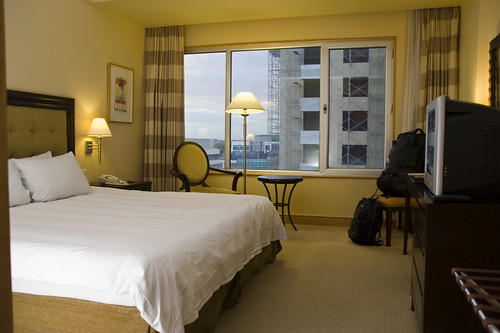
This is a picture of my hotel room prior to the problem.
It wasn't my plan to come and stay at The Bellevue, a four star hotel, upon arriving in Manila. My McShit T-shirt

instigated a conversation with a middle aged, Portuguese, semi-conductor-troubleshooting guy who recommend I stay in the suburb around his hotel. "How much would a bus/taxi/jeppney cost to get there?" I enquired. My new friend, Amilcar, replied, "just come with me".
Manila is a sprawling megapolis in great contrast to the denseness of Seoul and other Korean cities. Transportation infrastructure as we know it in places like Europe, Tokyo, Korea and Toronto doesn't exist here. The only option is four wheels and it takes a long time to get anywhere. Amilcar's company footed the bill for the private taxi (an unmarked car, contrary to what one might think, it's the safest way to travel here) to The Belleveue. And once there he negotiated a company rate for me on my room. I figured, "what the hell", why not splurge on a nice hotel while I get my feet on the ground here. (Just had to use my flashlight to find some tissue in my bathroom... it's sooo dark in there.) Manilla was never supposed to be an overnight thing, not until my work gave me a day's notice that I needed a criminal record check if I wanted to have a job upon my return. So now I must visit the Canadian embassy and go through all sorts of hassle to get this document and must be done before I step back on Korean soil.
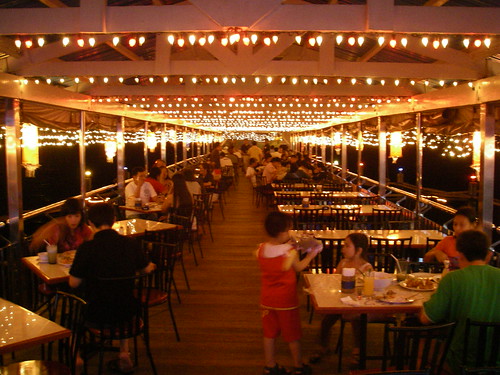
The hotel is great, super fancy, I feel like a backpacker staying at the ritz. Luckily I brought one shirt without profanities scribbled across it and so I dressed the part of a Bellevue guest. Amilcar and I met up and headed down to the peer, a thirty minute taxi ride away. Our assigned driver joined us for some drinks and dinner.
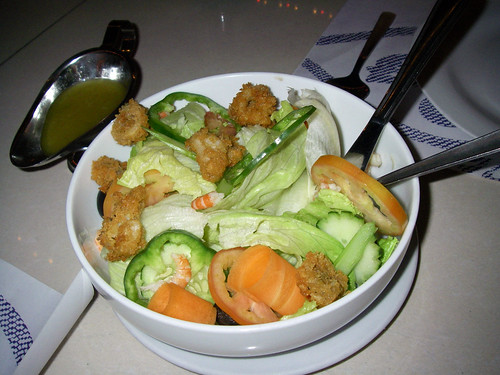
Both the atmosphere and dinner were amazing! Such a nice treat from my usual gimbap changu meals. We got, mozzarella sticks thicker than Andre the Giant's thumb, a huge stack of onion rings, a beautiful green salad, spicy prawns about the size of Andre's middle finger, a large fish we pointed to in a tank fried to perfection, chop-suey exploding with vegetables, mixed rice and some of the best beer I've had in ages. All this was consumed on a cozy peer stretching into the bay for about 17 bucks a person. It's reassuring to know this was considered the high end dining in the Philippines. I'm sure future meals will prove to be even more delicious for even less money.

I can't believe I posted such crapy pictures... Never again!
After the meal Amilcar, the driver and myself headed to a bar in the vicinity. There I had the worst Mojito of my life, a clear watery drink with a pice of lemon floating around at the bottom. Entertainment consisted of dancing women. We had to keep them away from our table or there would have been an extra charge. Then some staff-guy started massaging my back, I should have known a tip would be expected. My smallest bill at the time was 500 so he got about 10 bucks, a good score for 10 minutes work. Then the waiters and waitresses wanted tips once we settled up and the guy who opened the car door for me expected a "parking tip". To top it all off, our driver made very clear the money we were paying for his service was going directly to the hotel and not to him. So after we provided food, beer, entertainment and riveting conversation he expected a tip too, hence my fear to get someone sent up to fix these damn lights!
I'm not opposed to tipping, I just really unaccustomed to it after three years spent in Korea, a country where tipping is nonexistent. And even though I try to calm myself by acknowledging these people make very little and the money is going to support a family, I still don't appreciate it when people request a tip.
To sum up it was an unusual first day, far from what I had envisioned but good experience nonetheless. My friend Amilcar allowed me to have a hugely discounted taste of the so called "good life" here in the Manila. But I am already eager to get back to street level here in Manilla.
Other Interesting Things:
-A dog is employed at my hotel, his job is to sniff for bombs/drugs
View Larger Map
This map is INTERACTIVE!
Click on flags for a description
Double click to zoom
Click and drag to move map
My lights wont turn on, at least not the ones wired into the wall and ceiling. I can't explain why my keycard isn't activating the main breaker. I'm too scared to call the front desk and request that someone to come up to the eighth floor and fix it for I might have to tip them.
This is a picture of my hotel room prior to the problem.
It wasn't my plan to come and stay at The Bellevue, a four star hotel, upon arriving in Manila. My McShit T-shirt
instigated a conversation with a middle aged, Portuguese, semi-conductor-troubleshooting guy who recommend I stay in the suburb around his hotel. "How much would a bus/taxi/jeppney cost to get there?" I enquired. My new friend, Amilcar, replied, "just come with me".
Manila is a sprawling megapolis in great contrast to the denseness of Seoul and other Korean cities. Transportation infrastructure as we know it in places like Europe, Tokyo, Korea and Toronto doesn't exist here. The only option is four wheels and it takes a long time to get anywhere. Amilcar's company footed the bill for the private taxi (an unmarked car, contrary to what one might think, it's the safest way to travel here) to The Belleveue. And once there he negotiated a company rate for me on my room. I figured, "what the hell", why not splurge on a nice hotel while I get my feet on the ground here. (Just had to use my flashlight to find some tissue in my bathroom... it's sooo dark in there.) Manilla was never supposed to be an overnight thing, not until my work gave me a day's notice that I needed a criminal record check if I wanted to have a job upon my return. So now I must visit the Canadian embassy and go through all sorts of hassle to get this document and must be done before I step back on Korean soil.
The hotel is great, super fancy, I feel like a backpacker staying at the ritz. Luckily I brought one shirt without profanities scribbled across it and so I dressed the part of a Bellevue guest. Amilcar and I met up and headed down to the peer, a thirty minute taxi ride away. Our assigned driver joined us for some drinks and dinner.
Both the atmosphere and dinner were amazing! Such a nice treat from my usual gimbap changu meals. We got, mozzarella sticks thicker than Andre the Giant's thumb, a huge stack of onion rings, a beautiful green salad, spicy prawns about the size of Andre's middle finger, a large fish we pointed to in a tank fried to perfection, chop-suey exploding with vegetables, mixed rice and some of the best beer I've had in ages. All this was consumed on a cozy peer stretching into the bay for about 17 bucks a person. It's reassuring to know this was considered the high end dining in the Philippines. I'm sure future meals will prove to be even more delicious for even less money.
I can't believe I posted such crapy pictures... Never again!
After the meal Amilcar, the driver and myself headed to a bar in the vicinity. There I had the worst Mojito of my life, a clear watery drink with a pice of lemon floating around at the bottom. Entertainment consisted of dancing women. We had to keep them away from our table or there would have been an extra charge. Then some staff-guy started massaging my back, I should have known a tip would be expected. My smallest bill at the time was 500 so he got about 10 bucks, a good score for 10 minutes work. Then the waiters and waitresses wanted tips once we settled up and the guy who opened the car door for me expected a "parking tip". To top it all off, our driver made very clear the money we were paying for his service was going directly to the hotel and not to him. So after we provided food, beer, entertainment and riveting conversation he expected a tip too, hence my fear to get someone sent up to fix these damn lights!
I'm not opposed to tipping, I just really unaccustomed to it after three years spent in Korea, a country where tipping is nonexistent. And even though I try to calm myself by acknowledging these people make very little and the money is going to support a family, I still don't appreciate it when people request a tip.
To sum up it was an unusual first day, far from what I had envisioned but good experience nonetheless. My friend Amilcar allowed me to have a hugely discounted taste of the so called "good life" here in the Manila. But I am already eager to get back to street level here in Manilla.
Other Interesting Things:
-A dog is employed at my hotel, his job is to sniff for bombs/drugs
Wednesday, July 30, 2008
Sand Flee Bites

"You know what the best feeling... well maybe second best feeling in the world is? Digging your feet deep into the warm, soft sand on a balmy evening at the beach."
-Greg Samborski speaking to his friends at the beach.
1 Day later:
"Clair, did you get any red spots on your feet? No? Well, I looked at some pictures on google and they're definitely sand flee bites. Ya. they're little, red round bumps, didn't show up for a day or so and are super itchy. I was reading that these flees can carry some pretty nasty diseases. You might not even know your infected for some time. Uh-huh, yep. I know exactly how it happened..."
Thursday, July 24, 2008
ExpoDisc Review - Not Just for Pros

Title: Expodisc
Photo by: mattiasj
I'd like to think my photography is beyond amateur by now, but I am by no means a pro. I spend a great deal of time on my hobby and have recently had some paid work shooting UFC style events, billboards and website shots in Seoul, Korea.
Gray balance has always intimidated me. I finally decided to overcome my fear and applied myself to studying the art of gray balance. In my quest for knowledge, I came across the word "ExpoDisc" hundreds of times. It wasn't until the hundred-and-first time that I actually decided to figure out what an ExpoDisc was.
The more I read, the clearer it became that this was the ultimate gray card solution. I ordered the 77mm ExpoDisc even though I don't even own a 77mm lens. My rational for doing so is that most professional lenses are 77mm. Thus, I can grow into this filter and in the mean time it will fit all my smaller lenses. It wont lock on, because it's too big, but it's just a matter of holding the filter up against the barrel, no big deal. At $99 bucks a pop, you don't want to be buying one of these for each lens.
An example of the ExpoDisc in action:
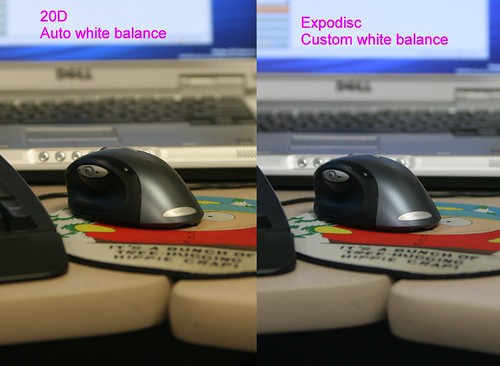
Title: Expodisc indoor comparison shot
Photo by: Bob Reck
ExpoDisc Pros:
-Nice packaging (Packaging is your first impression, it says a lot about the company quality of the product contained within)
-Simple to use
-Great instructions that not only tell you HOW to use it, but also, WHY to use it which I appreciate.
-Well built, feels very solid
-Case and lanyard included
-Instant gratification when your photos come out looking heaps better
ExpoDisc Cons
-Case could be more streamlined, a little clunky
-Yes, it's pricy
Conclusion
Every photographer can benefit from an ExpoDisc. To steal a quote from the packaging, "Why didn't someone think of this sooner?"
Greg
www.comatosed.ca
Ps. I think this is the first time I've ever given a product a 5 star rating.
Sunday, July 20, 2008
Cool Stacked Mac
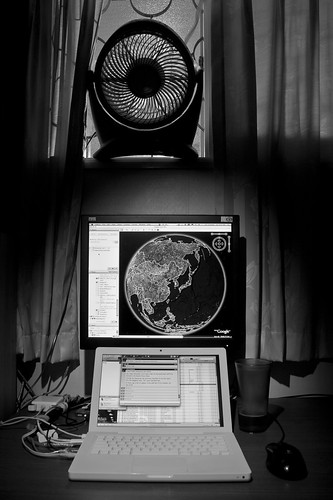
I've worked with the BTC 19" monitor on my right side ever since I bought it three years ago. Recently I've felt pain in my right shoulder and up through the right side of my neck. It's stiffness combined with mild burning. I suspect it has something to do with me A: Spending too much time in font of my computer, and B: Having my master monitor positioned to the right.
So I decided to stack em for a change. Not only that, I jerry rigged my fan to the window using some string and man does it feel freak'n phenomenal! I've got cool air blowing in from the hallway and what I hope will turn out to be more ergonomic monitor set up. Only time will tell...
In the mean time, I'm only thirteen monitors away from this:

Thursday, July 17, 2008
'Fixing' People

Original Photo / Edited Photo / Side by Side Comparison
The idea of 'fixing' people still wrestles with my conscience, but it's so damn fun. And this is where problem lies, makeup artists want to show off their skills, photographers theirs, and finally the photoshopers theirs! So you have now had a minimum of three artists work on a 'piece' rather than a human, no wonder the people we see in magazines look anything but real.
This is the second glamor touch up I tried after the initial youtube tutorial I followed using a photo of myself.

I pretty much overdid EVERYTHING here but it's always difficult to use a new skill in moderation, just have a browse through the 'My First HDR' group to see examples from others who suffer from my affliction.

Overdone... ya... but the process taught me soooo much and has thus given me fresh ideas on how to take my post production to a whole new level. I just hope I can learn less is more quicker than I did with HDR.
Monday, July 14, 2008
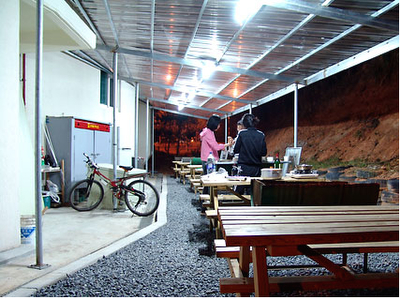
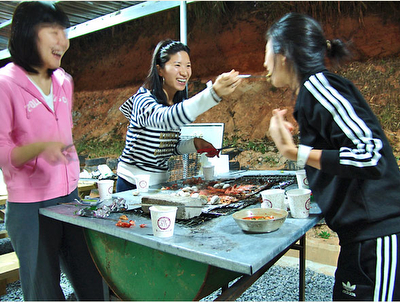
Boryeong Mud Festival - July 2008

It's here again, Korea's best festival which so aptly combines mud, foreigners and drunken debauchery into a single week long event. My girl friend, Hyun Mi spent most of her work day looking into lodging. Most places were booked months in advance, but one lodge could not evade her super sleuth-y-ness. Not only did she find a clean place which sleeps 9-12 (Korean sized people I'm presuming), she found one that was close to the beach with outdoor grills, tables, a super nice owner and a very cheap price.
I will attempt to include all relevant information in this blog entry. If you have comments or still have unanswered questions please leave a comment below.
The Plan
1. Arrive in Boryeong sometime on Saturday July 19th
2. Drop stuff off at Opera Pension (our lodge)
3. Get drunk and muddy
4. All meet for dinner at Opera around 7pm
Hyun Mi and I will go about buying tons of gogi (meat), lettuce, sauces, onions, garlic etc. It'll basically be a giant Sam Gyup Sal / Galbi party.
Be sure to BYOB!!!
(Based on two festivals experience, seafood is your only food of choice on Daecheon Beach, or any beach in Korea for that matter. The Daecheon beach seafood is both expensive, substandard and can't come close to our patio-grill vibe.)
5. Party on at the guest house or hit the festival again.
6. Leave sometime the next day.
So there are 11 spots for sure, and possibly more depending on how things look once we get there. Spots will be given on a first come first serve bases. Hyun Mi and I have already paid for the place, so to avoid collection hassles and fence sitters we ask that you wire 26,000w to me. Contact me and I'll give you my bank info.
Price Breakdown: Thanks to Hyun Mi's bargaining skills the room is only 160,000w
Room 16,000 -Based on 10 people
Dinner 10,000 -Per person, likely all you can eat gogi
If we get more or less occupants, the room price will be adjusted accordingly on location.
Tired of reading? Here are some pictures.
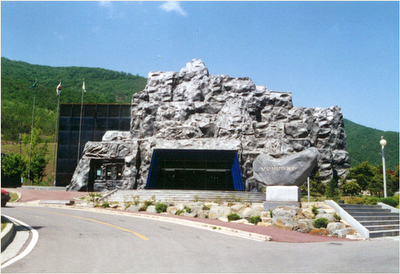
*Accommodation may not be exactly as show. If you imagine it without the bird, lawn and mountains and substitute road side for beach front you'll have a pretty accurate image of where we'll be staying. Or, you can just check out the image below.

This is the side profile where you can see how the name is spelt. O-PE-RA

I'm pretty sure the beach wasn't photoshopped in this picture which means it is walking distance

The inside looks really nice
And this is where we will grill
Look! What fun!
Oh, and James Bond's arch nemeses Jaws keeps a summer home here too.
Info:
About the Mud Festival:
Info on Wikipedia
Info on Work N Play
Previous Photos:
Boryeong Mud Festival 2007
Boryeong Mud Festival 2006
About Opera Pension, our accommodation:
Opera Pension Site
Website Navigation - Click to Enlarge

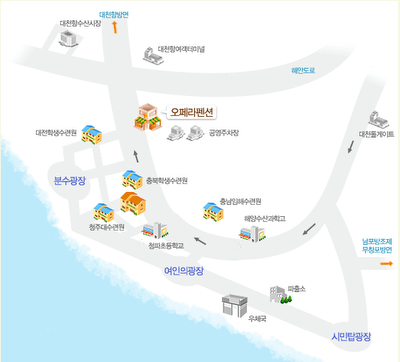
You will find the name, address and phone number at the bottom of the official website page. Here's a little map which can also be found there:
Sunday, July 13, 2008
Operation Floor Scrub
Administration decided (Friday at 4pm right before we were all about to go home) to repaint the walls at our Language Center / Hogwan. I figured I'd take the opportunity to clean the 10+ years of filth off the floor while everything was in disarray. Covering only four tiles in 10 minutes, I realized I had been overly ambitious and thought hard about how I could make job easier on myself. The only solution was child labor. 20x25 tiles, divided by roughly 30 students... I have no idea how that works out but I guessed the job could be done in about two hours.
The next day I planned a lesson around cleaning, taught them some key vocabulary, i.e. "That's a half-assed job" and gave each kid a green brill pad. Korean kids generally hate getting dirty and anything that is dirty, I've heard of teachers who straightened out trouble makers by simply holding their possessions in the general vicinity of the garbage can.
To overcome this dirt-a-phobia and demonstrated how to scrub the floor using your foot and emphasized how important it was to only move one square at a time. Each clild was assigned a quadrant and the scrubbing began.
For the most part, the job was a huge success. The youngest class really enjoyed the task, worked hard (with the exception of Anthony) and followed my instructions (with the exception of Anthony) as well as any 10 year olds would (with the exception of Anthony). The older students grew tired of the task more quickly and if you watch the upper right corner you'll see Jong Min idling in my chair, spraying the floor now and then just making a bigger mess. I showed him this damming evidence the following day and now he knows to at least act like he's working hard when my camera is out.
The remainder of the video is me decorating my 35 degree and horribly humid room. I consulted with Clair by telephone, text and video to get some interior design ideas - they were great! Unfortunately, everything I put up was on the floor the following morning. I'm not sure if it's the heat/humidity that caused it or the fact the paint is so fresh.
Friday, July 11, 2008
Cranillium Attacks
The writing below refers to the darker version here --> Darker Version Can't decide which is better...
------------------------------------------
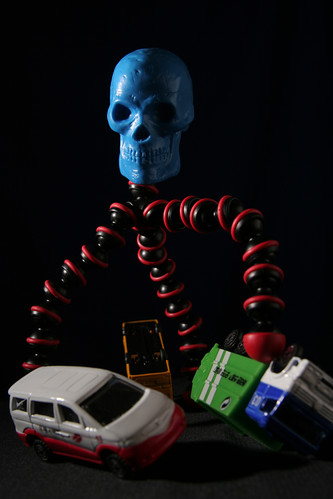
Idea:
My new GorillaPod arrived in the mail today! Before I continue, I must commend Joby on their excellent customer service. One of the joints on my GorillaPod became so loose it rendered my pod to nothing more than a photo prop. I contacted Joby from my home here in Korea and they offered to replace the pod free of charge. In fact, they even let me upgrade to a larger GorillaPod, the Zoom, and credited my Visa for the cost of the original. That's customer service.
So there I was at work, fooling around with my new toy and the idea came to me. I picked up the musical-shaker-skull in Canada to use as Pavlovian device in my children's classroom. The idea was to create a strong link between "shaka shaka shaka" and "Listen!". It never really worked but the kids adored Skully. One day I had to run down to the office and I told my kids Skully would be keeping an eye on them, propped him on my GorillaPod and everyone had a good laugh at the sight.
But this was to be no laughing matter. I envisioned carnage, wreckage, chaos, fear and weirdness. On the bike ride home I picked up a set of toy cars for $4.00 and got to work setting up the shot.
Strobist Info:
Setup:
The scene took a while lay out. I started with a giant tin of tomatoes and put a cutting board covered with my Nike athletics shirt on it. I had to find stuff to prop up the cars and it had to be small enough to remain out of site. In the end I used a wire splicer and socket. The lighting setup was pretty simple, just a flash located up to the rear left side and a white hand held Styrofoam reflector on the front right side.
Conclusion:
I took a number of shots and chose this one because it was the "darkest" of the bunch. I like how Skully slips out of the heavy shadows on the right side. I'd have preferred slightly more DOF to bring the cars into focus and a lower perspective to give the sense of an overbearing monster. Also, the highlights are a little strong on the vehicles but I found when the vehicles looked well exposed it took away from the chaotic feel. The bright light from the left side illuminating the 'ground' and vehicles could be head lights, search lights, UFO lights, etc. The name of the photo is derived from Cranium and Gorilla - Cranillium
Technical Info:
Camera ------- D350 / Rebel / Kiss
Lens ----------- Tamron 28-75 f/2.8 @ 63mm
Shutter -------- 1/200
Aperture ------ f/6.3
ISO ------------ 100
Flash 1 Blitz - 1/16 Power
Flash 2 Zap -- No
Tripod --------- Yes
Photoshop:
NONE
Wednesday, July 09, 2008
Ice Cream is Reason Enough

See the Setup
See the Shot
Read the Blog
Reason enough to blog about. Reason enough to play with my new camera toys. Reason enough to stay in Korea. What other country sells a 500ml BUCKET of premium ice cream for $2.50. Ok, I'm sure there are many out there but Canada isn't one of them.
And why the hell did we Canadians ever accept the idea ice-cream could be sold in cardboard boxes? You don't need to be a packaging genius to figure out ice cream shouldn't be sold in any container with more then one opening, I learned that when I was five and started with the bottom of my ice-cream cone.
Strobist Info:
I gotta say, Nick Wheeleroz was a huge inspiration to me in doing this. After studying his work, the work of his contacts and the contributions of all the people over at www.strobist.com it gave me the push I needed to venture into the world of flash photography.
So this is my first strobist post. My new gear arrived about a week ago and I played around much less then I'd have liked to since then.
Idea:
Originally I just wanted to blog about how much I enjoy cheap ice-cream. Then the idea came to me to fuse my adventures in strob-ism with my ramblings and thus this photo was born.
Setup:
I knew wanted diffuse light and a nice close up shot. I've seen Nick Wheeloeroz use Ikea chopping boards in many a setup so I borrowed his idea. My board isn't from Ikea, it's a thick Korean-made board picked up here at a local dollar store and is well used.
First I attempted to lazily balance the board on top of my brand new Vivitar 285HV flash which was an accident waiting to happen, so I propped the board up on some cans. I placed a white piece of poster board / Styrofoam behind the scene, set my flash to M, Canon D350 to 1/200 at f/6.3 and took my first test shot. It came out almost pure white so I dialed down to 1/16th on the flash.
My shots were still coming out to bright even at f/9. I didn't want to sacrifice sharpness by shrinking my aperture so I decided to defuse even more. The diffuser of choice... a free cream-colored lens cleaning cloth that came with the Tamron 28-75 f/2.8 I was using. I folded the cloth in half and placed it directly on my flash and it reduced the light but this time too much. Thus, I unfolded it, played around with the aperture a bit, and got the shot above.
The shot pleased me but I had to know what a secondary light source could do for the photo. So I unpacked my brand new umbrella, propped it up on my cloths drying rack and shot through it with my second Vivitar, Zap, (yes... I named it). I set Zap to 1/4 and got decent lighting, as in it was a good looking histogram. Unfortunately, it didn't look so hot on screen (Here's that picture). I think the reason is that the large soft light actually flattened the image because is was spilling onto my background.
There's a lot left to be desired as far as subject, focus, composition and creativity go but I am happy with this on a technical level as I feel more confident shooting with flash than I did a day ago.
Technical Info:
Camera ------- D350 / Rebel / Kiss
Lens ----------- Tamron 28-75 f/2.8 @ 50mm
Aperture ------ f/9
ISO ------------ 100
Flash 1 Blitz - 1/16 Power
Flash 2 Zap -- No
Tripod --------- Yes
Photoshop:
WB ------------ Slight Temp Decrease
Notes:
White Poster Board
$2.50 Oreo Ice-cream
White Cutting Board
Vivitar 285HV + Cactus V2s
ExpoDisk Neutral
Lens Hood
Lens Cleaning Cloth
Tomato Paste
Red Kidney Beans
Baked Beans
Manfrotto Tripod + Ball Head
Canon D350
Tamron 28-75 f/2.8
48" Dual Umbrella
Flash Bracket
Cactus V2s
Saturday, May 17, 2008
080515-Mach 199 to Chongam
View Larger Map
Date: 080515-Thursday
Starting Point: Iksan, South Korea
Riders: Greg - Hyosung 650 GTR, Older Greg - Honda 750 Magna
Terrain: Highway and secondary
Curves: Nice mix of constant sharp and soft curves
Grade: Mostly flat
Difficulty: 7/10
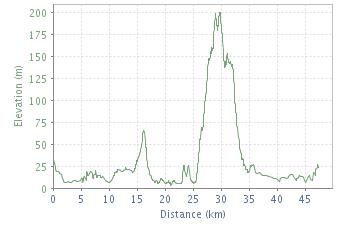
GPS Trip Data:
Summary Data
Total Time (h:m:s) 3:41:48 1:30 pace
Moving Time (h:m:s) 1:59:31 0:48 pace
Distance (km) 146.67
Moving Speed (kph) 73.6 avg. 199.2 max.
Elevation Gain (m) +535 / -553
Temperature (°C) 16°C avg. 16°C high
Distance Data Total (km) % of Total
Distance 146.67 100
Ascent 6.73 4.6
Descent 6.05 4.1
Flat 133.88 91.3
Description:
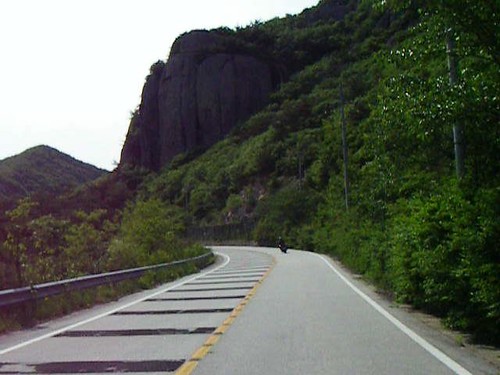
This time around I followed Greg due South over some of the most brilliant terrain I've seen to date in Korea. You have to pay your dues on bland, open stretch of highway for the first 40km or so, but the payback is ten fold once you're finally able to veer-off into a mountainous valley. The country road snakes its way through farmers' fields, along side a meandering river, and every now and then steep mountains expose their sheer granite faces from behind the lush green foliage.
There is hardly a meter of road which follows a straight line. The curves vary from gentile to tight while elevation remains fairly consistent. Unfortunately, slightly raised black stripes of asphalt stretch across every corner however, even at 120km an hour, they are barely noticeable. If anyone knows what purpose these stripes serve I'd be eager to know.
Eventually the road opens up and passes through a small town but this is no where near the end of the journey. Only 5km away lies another stretch of twisty highway, this time overlooking the West Sea and a chain of Korean islands just off the coast. In addition to curves, there are now decent rises and dips along the way. We chose to turn around at the port in Chonggam, backtracked a ways, and hit up a new beach for a beer and some Ramion noodles. Greg and I both agreed that the return route along the costal section somehow felt far better in the corners.
After a short rest on the beach Greg and I choose a new path to return to Iksan on. The fist section of highway contrasted nicely with the previous sections, now we could open our bikes up to around 140 and enjoy some big, wide bends. Alas, all good things must come to an en, we joined up with the bland, open highway we began on and weaved our way through the traffic back into Iksan.
Motorbike, Rides, South Korea, Routes, Paths, Review, Google Earth, KML, KMZ, Greg, Hyosung, 650cc, GTR, Honda, 750cc, Magna
--------------- www.comatosed.ca ---------------
Friday, May 02, 2008
080502 - Ride to the Ridge
View Larger Map
Date: 080502-Friday
Starting Point: Iksan, South Korea
Riders: Greg - Hyosung 650 GTR, Older Greg - Honda 750 Magna
Terrain: Highway, secondary, soft pack, gravel
Curves: Good once in the mountains
Difficulty: 6/10
GPS Trip Data:
Summary Data
Total Time (h:m:s) 1:44:23 2:12 pace
Moving Time (h:m:s) 0:55:43 1:10 pace
Distance (km) 47.41
Moving Speed (kph) 51.1 avg. 168.3 max.
Elevation Gain (m) +479 / -489
Description:
Having scouted the area previously, both on wheels and by satellite, I noticed a road that cut across the mountain ridge to the north east. Eager to see it first hand, Greg and I set off on the adventure. It's a slightly challenging one and a half hour round trip that begins in Iksan and takes you through a beautiful mountain pass to a lake. After the lake, the going gets rough and slow on the mountain ridge only because our bikes weren't designed to be ridden off road.
After taking in some great views at 200m above see level the ridge descends quickly back to sea level and reconnects with the main road. Highway 27 can be taken as a quick route back into Iksan city. I wouldn't ride that ridge section more than once on a sports bike (unless I was showing it to someone else), however, it would be ideal route for an enduro or a nature walk.
Motorbike, Rides, South Korea, Routes, Paths, Review, Google Earth, KML, KMZ
--------------- www.comatosed.ca ---------------
080417 - Round Trip Reccy
Date: 080417-Friday
Starting Point: Iksan, South Korea
Riders: Greg - Hyosung 650 GTR
Terrain: Highway, secondary, soft pack, gravel
Curves: Good once in the mountains
Distance: 70km
Difficulty: 4/10
View Larger Map
Description:
A simple one hour round trip that begins in Iksan and takes you through a beautiful mountain pass to a lake. The path cutting across the mountain to the north is about 8km long and mostly made up of large gravel. I wouldn't ride that section on a sports bike again however it would be ideal for an enduro or a nature walk.
After visiting the lake the path cuts back through the mountains and into Iksan. There are some nice tight turns in the mountain. Not to much change in elevation and the corners don't last for long. Nonetheless, a good distance and duration for the rider who just wants a quick get away in the middle of the day.
Thursday, February 14, 2008
080214-Documentary Night

Tired of Korean TV? All your friends on FaceBook too busy actually working? Wanna learn stuff you'll wish you hadn't? Come check out one of tonight's documentaries:
Our Daily Bread - Unser taeglich Brot (2005)
Manufactured Landscapes(2006)
Cast your vote at 2100, majority wins.
Start Time: 2100
Location: Sahara's House -- Call/Text me for specifics
Previous Nights
080207 - The Revolution Will Not BeTelevised (2003)
- Some questioned the neutrality of this documentery, it was largely pro Chavez yet produced in part by the Scottish Film Board. Everyone could agree it was nice to see people get angry, take peacefull mass action and change things.
- Further Discussion: I got kinda drunk that night and only remember the last three hours of dialogue revolving around photography and motorbikes...
080124 - A Crude Awakening: The Oil Crash(2006)
- "Oil is the excrement of satin" or something to that extent. Aside from that opening line, a well done documentary which does a good job of explaining just how cheap and energy laden oil really is when you compare it to human exertion. (Put a cup of gas in your car and it'll take you, four friends and a bunch of luggage a few kilometers. Ask a rickshaw driver to pull you the same distance and for 20 cents and you'll probably be cursed at in a language you don't understand... maybe even spit-on.)
- Further Discussion: Oil industry in Canada, Living in Chemical Valley, Being a tradesman and making mad cash...
Tuesday, February 05, 2008
Safari 3 Crashes - How to Revert to Old Safari 2.0
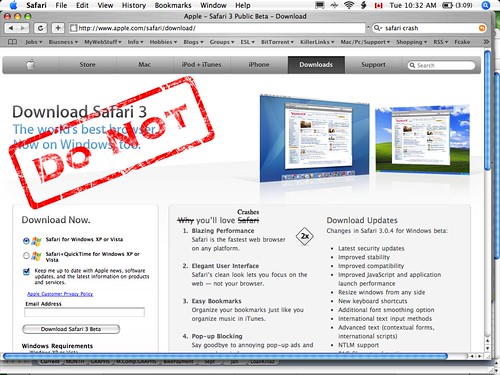
OPTION A - Spare me the sob story and just give me a solution:
OPTION B - I wanna read about your problems and see how you came to a solution
OPTION A
The Safari 3 Crash Fix - Revert to Safari 2:
1. Download Safari Application from:
http://rs18.rapidshare.com/files/16056640/Safari.zip
2. Extract zip file
3. Back up current Safari Application (HD:Applications:Safari)
4. Quit Safari
5. Move downloaded Safari application to Applications folder and click "Replace"
6. Open Safari and enjoy relatively crash-free browsing! :D
OPTION B
The Problem
So I made the fatal mistake of upgrading to Safari 3.0 a few days back. At the time I had also just installed Speed Download. Every time I quit Safari it crashed. Every time I closed a window Safari crashed. Often when I opened new tabs Safari Crashed. The point I'm making is that Safari 3 crashes a lot.
Initially, I figured Speed Download was part of the problem. I uninstalled the program and was sad to learn if fixed nothing. Many other Safari 3 users have reported displeasing performance. It is the first Apple update/upgrade that has actually forced me to revert to an older version.
The Search for a Solution
I wasn't the only one searching for a Safari 3 fix. Many users wanted to revert to an older version but is wasn't as simple as one might think. Apparently Safari 3 came with an uninstall option packaged with the .dmg file, not anticipating any problems, I must have thrown it out in a desperate attempt to create space for music and movies. Nor could I download the package again from Apple servers. My only options are Safari downloads for XP and Vista or the security update package bundled with Safari 3 which I presume has no un-install option.
Many people have gone to sites such as www.oldversion.com to try and get older Safari versions but none of these worked for me as the installer detected a newer Safari on my drive and thus wouldn't let me reinstall. I was so eager to get Safari working again that I just trashed the application, in the hopes an older version would install once it was gone, and I didn't even think to make a backup of the application. Now I was really screwed.
The Fix
In the end I found a rapidshare link with just the Safari 2.0.4 application, no installer. I downloaded it, threw it into my applications folder and everything is running smooth again!
Directions:
1. Download Safari Application from:
http://rs18.rapidshare.com/files/16056640/Safari.zip
2. Extract zip file
3. Back up current Safari Application (HD:Applications:Safari)
4. Quit Safari
5. Move downloaded Safari application to Applications folder and click "Replace"
6. Open Safari and enjoy relatively crash-free browsing! :D
Subscribe to:
Posts (Atom)
